DIY Wood Blues

Thursday 31 October 2013

The Other Bench; Door Bench; Backpack Hideaway

For those hard core dedicated fans....***This is not one of the BORROWED IDEAs...However, I do accept new followers!!!!

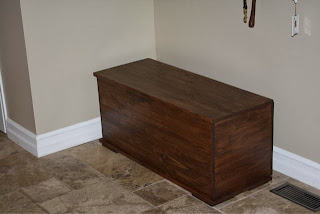
At our previous house, we went crazy over the backpacks/bags & purses strewn across the floor. What to do with them inspired many a discussion. After moving to the new digs, the same issue appeared. Those aforementioned bags are still tripping us up!
So I took it upon myself to load Junior into the "HOddyssey" and go on
 a lumber run.  We picked up some 2x2's, some 16x96 pine laminated whiteboard, a piano hinge and we were on our way! Total assembly time inclusive of cuts was an afternoon. With the help of my nieces and nephew, we had it all assembled in about 6 hours. The best part of this project was young J getting involved physically & mentally. He made a couple of cuts. This helped him connect the dots. The kid loved it. As we know, staining, & finishing requires time and patience.  This is why the blog is here now.

The next step is finding some hardware to accent the piece. Some handles, a clasp, etc. If anyone has a recommendation on a good place to find such hardware in the greater Toronto area, please feel free to share.

Thanks


Wednesday 30 October 2013

Borrowed Ideas

Hi folks.

On my blog I have included some links to other blogs where I/we have "Borrowed Ideas" from. One is a wonderful idea my wife found that has turned out great. The other is an idea I found that will accomplish a wish my wife has. She loves it and so do I and I look forward to the challenge and the creative process to pull it together.

Both of these bloggers are talented and have some great work. I thank them for the inspiration.

Ryan

Monday 28 October 2013

Nursery Wall Decor - Name Plates

The more I think about it, it was shortly after my son was born that I dusted off the palm sander and bought a small can of poly. Our daughter's room had her name above her bed and my wife wanted Junior's room to have something similar. We threw ideas back and forth. Being a big Blue Jays and baseball fan our first thought was a bat. A few factors had me rethinking this idea for a few days.

1) mounting a bat to a wall is difficult considering there is not a flat surface to place against the wall.
2) I am unable to come up with a safe, viable solution where a bat could be ripped in half.
3) wooden bats are more expensive than I thought.

The next sensible (and most sensible) idea as a Canadian which also eliminated the factors above would be a hockey stick. Jr sticks are affordable and flat. As well, minimal time is required to make them. Quite simple easy. 

The bill of material included a Jr. sized stick, some letters from an Arts & Crafts store, some ribbon, a can of spray paint, some screw caps and some poly. Ribbon & paint in whichever colour desired. Our son's room had a light brown, navy and chestnut brown pallet. We chose a navy paint and chestnut brown ribbon to compliment the natural grain of the stick. His room at our new house is a light blue, and the paint was picked based on his bedding and of course the stick!

Preparation involved sanding the manufacturer's painted logos off the stick and removing the existing finish. Next, I applied two coats of poly. While each coat of poly was drying, I applied two coats of paint to the letters. Once everything was dried, I measured 16" (I have now learned, depending on the # of letters required, you can measure 8") from each side of the Center mark and counter sunk a couple of holes for attaching to the wall. These measurements were chosen for lining up to the stud framing. Then to give the impression of a taped hockey stick, we wrapped the ribbon around the blade and knob of the stick and adhered it using Gorilla glue (we tried two-sided tape, but it would not hold). Then the letters were adhered using the same glue. 

We were quite surprised on the outcome and found a great gift idea. I have made each of my nephews a stick and some for friends. Even sold a couple.

I plan on experimenting with this idea on other sporting equipment. Such as Lacrosse sticks, Cricket paddles, Oars, and Canoe Paddles.

Enjoy.


Friday 25 October 2013

DIY bedroom bench

My wife and I purchased a new home (to us) this year. A much bigger home. Our first home was small, but charactered. I always wanted to find a way to furnish part of it with a refurbish or unique design, but my veggie garden and kids took precedent. Not to mention, my gear was in the garage....Brrrrr.
Now in our new home, (did I mention we have more space?) we have holes to fill. This was my opportunity to position myself for the need of machine upgrades (12" sliding DeeeeeeWalter is a great man) I convinced My wife that I had more to offer than a basement build (as in the old house and the old 10" fella that lived a good life); I had furniture chops...
Having a grandfather who himself was a woodshop high school teacher, a shop in his basement and a high school with an amazing shop (mr. Donnelly & mr. ball @ Arthur Voaden) I was influenced from an early age. The art my G-PA and specifically my Uncle display is somewhere I hope to be someday. Fine finishers. You have start somewhere...
Now, why the BLOG you ask????
After decorating and furnishing our master bedroom, My wife was stumped when when it came to the bench at the foot of the bed. She had purchased these bedside tables that matched her decor and style. She then came up with some ideas and we settled on a drawing that I felt could be mechanically and functionally achieved. She found the matching Martha Stewart paint! and we were in business....the inspirational fire was lit. The project was quite easy. Lacking a joiner and a planer, I am limited in my materials and need to pay a little more. The materials used were 16x96 laminated white board (pine) and 1x6 knotty pine boards. Lots of sanding, some countersunk screw holes and carpenter's glue. The screws on the X-boxes are hidden by the top and bottom boards. For the feet, I utilised the end cuts of the laminated board in order to raise it off the floor some.

Ryan